Usage guide
Day-to-day operation of the RemCam console. If you haven't set up yet, start with the install guide.
Opening the console
From your workstation, open the NX Witness desktop client and go to Web Pages → Server Admin. Sign in with your administrator account - or, once you've imported your client certificate, the console signs you in with the certificate automatically.
The server's screen is also an ordinary camera in NX: every management session is recorded in the VMS archive like any other feed.
Taking control
Viewing is always available; keyboard and mouse input require control, and only one operator holds it at a time.
- When you connect and nobody else has control, it's taken automatically - click the desktop and start typing.
- If another operator has control you join in view-only mode, with a banner naming who has it. You can take over from the menu (☰ → Take Control) - useful when a colleague forgot to release, and every acquire/release is written to the event log.
- Release control from the same menu when you're done watching but want to stay connected.
The console menu (☰)
- Ctrl+Alt+Del - send the secure-attention sequence to the server.
- Paste - type your local clipboard's text into the server; Get clipboard copies the server's clipboard back to yours. On the Linux text console, select text with the mouse to copy it.
- Fullscreen - the console fills your screen.
- Log - the event log: sign-ins, control changes, configuration changes.
- Licensing / Credentials / Networking / Settings - the management panels described below.
Display
- On Linux, the console can show the graphical desktop or the text console - switch in Settings (requires control, since it changes the server's active screen).
- Resolution is set from the same panel. Saving with the current value re-applies it - handy for reasserting the mode after a monitor or GPU hiccup.
- In text-console view, a zoom control adjusts text size locally without touching the server.
Networking & two-factor access
Out of the box the console is reachable only on the server itself and through the NX Server Admin page. The Networking panel controls direct network access, per interface:
- Enable - bind the console to that interface, at
https://<address>:8765. Always HTTPS. - Enable 2FA - require your client certificate at the TLS layer and your password at sign-in. Without the certificate the connection is refused before any login page is shown. With 2FA off, either the certificate or the password signs you in.
Accounts & certificates
The Credentials panel manages both:
- Administrator accounts - every account has identical full access (no viewer roles), and the last account can't be deleted. Typical commissioning: the installer creates the first admin, each technician then creates their own account.
- Client certificates - generate a certificate per
admin per device, and import the downloaded
.p12bundle into that device's browser. Certificates can be revoked individually, and each is pinned to its account. - Server certificate - the console's TLS certificate, regenerated here if the server's name or addresses change.
Sessions & security behaviour
- Repeated failed sign-ins lock the console out globally - after ten, only a service restart on the server clears it.
- Sessions expire after long idle periods and have an absolute lifetime; you'll be warned before expiry.
- Everything an operator does happens over the recorded feed - the VMS archive is the audit trail, and the event log adds the who-and-when.
ONVIF events
RemCam publishes its audit trail as ONVIF events under the
tns1:RemCam topic tree, so the VMS can alarm on, bookmark, and
search them alongside the recorded feed:
- Access -
Access/Login,Access/LoginFailed,Access/Lockout,Access/LockoutCleared,Access/SessionStarted,Access/Logout - Console control -
Console/ControlAcquired,Console/ControlReleased,Console/ControlTimeout,Console/ControlForced - Administration -
Admin/AccountCreated,Admin/AccountDeleted,Admin/PasswordChanged,Admin/BindingChanged,Admin/StreamChanged - Certificates & security -
Security/CertIssued,Security/CertActivated,Security/CertSuspended,Security/CertEnabled,Security/CertRevoked,Security/CertRejected,Security/CertsRevokedUserDeleted,Security/CVEIsolation,Security/CVEIsolationCleared - Stream -
Stream/Started,Stream/Stopped - System -
System/ServiceStarted,System/ServiceStopped,System/GettyRestarted - Licence -
Licence/Activated,Licence/Renewed,Licence/Changed,Licence/Expired,Licence/Deactivated
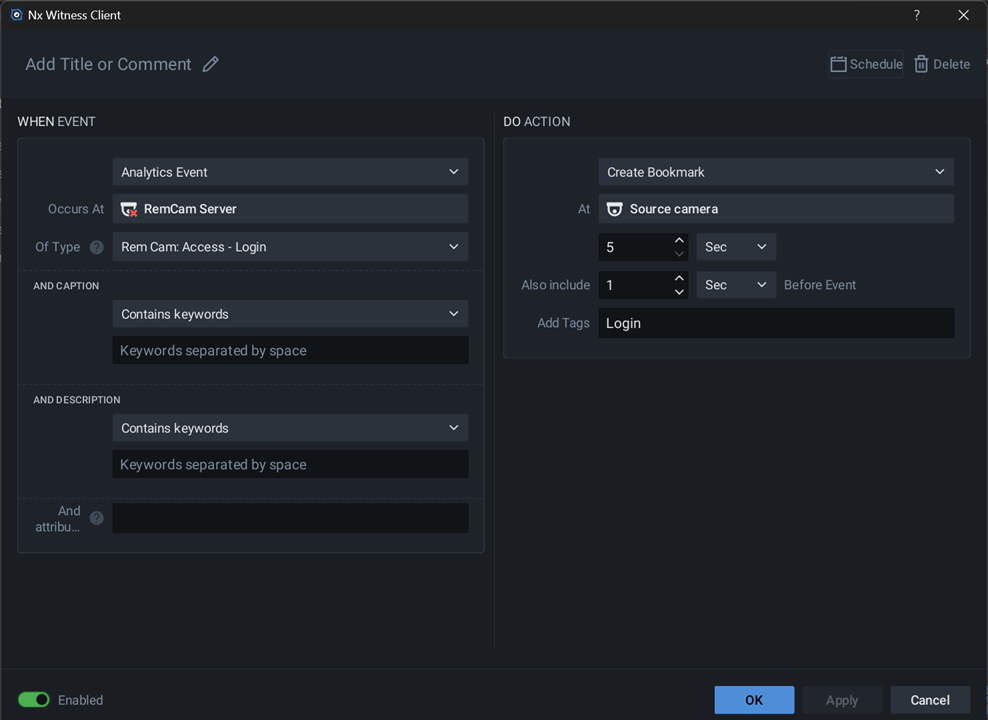
Access/Login analytics event occurs on the RemCam camera, NX
creates a bookmark on the recorded feed - a few seconds either side of the
sign-in, tagged Login. The same pattern works for any
tns1:RemCam topic and any NX action (notifications, alarms,
HTTP requests).Licensing & updates
- The Licensing panel shows trial status and takes your licence key - see the activation guide.
- On sign-in the console checks for updates; apply signed updates from the Settings panel when offered. Security-critical updates are flagged and time-boxed.
Need help?
Email support@remcam.software.